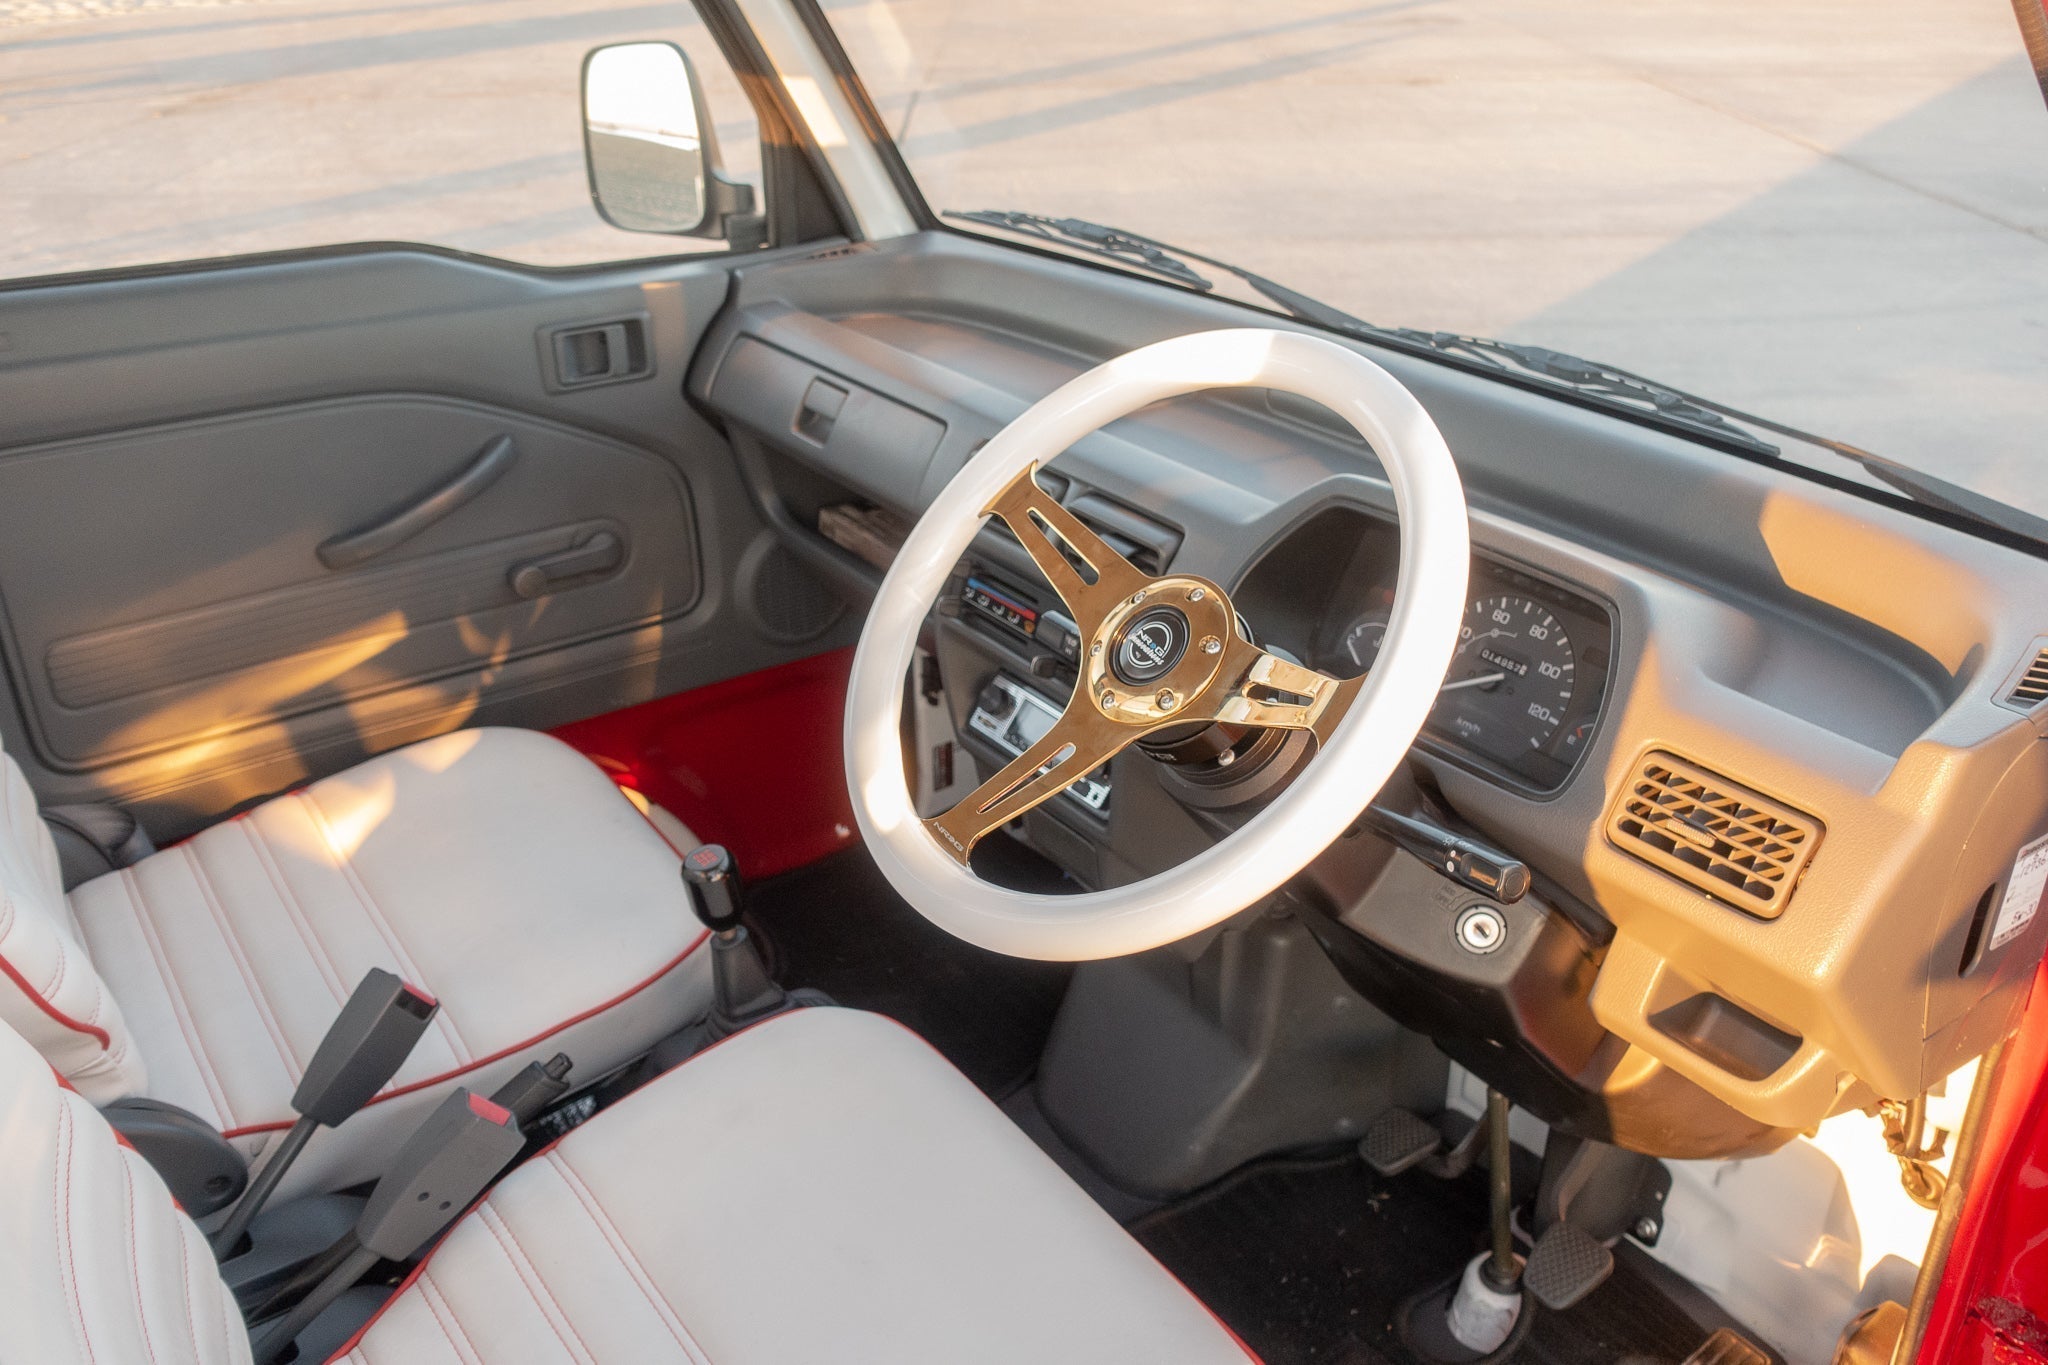
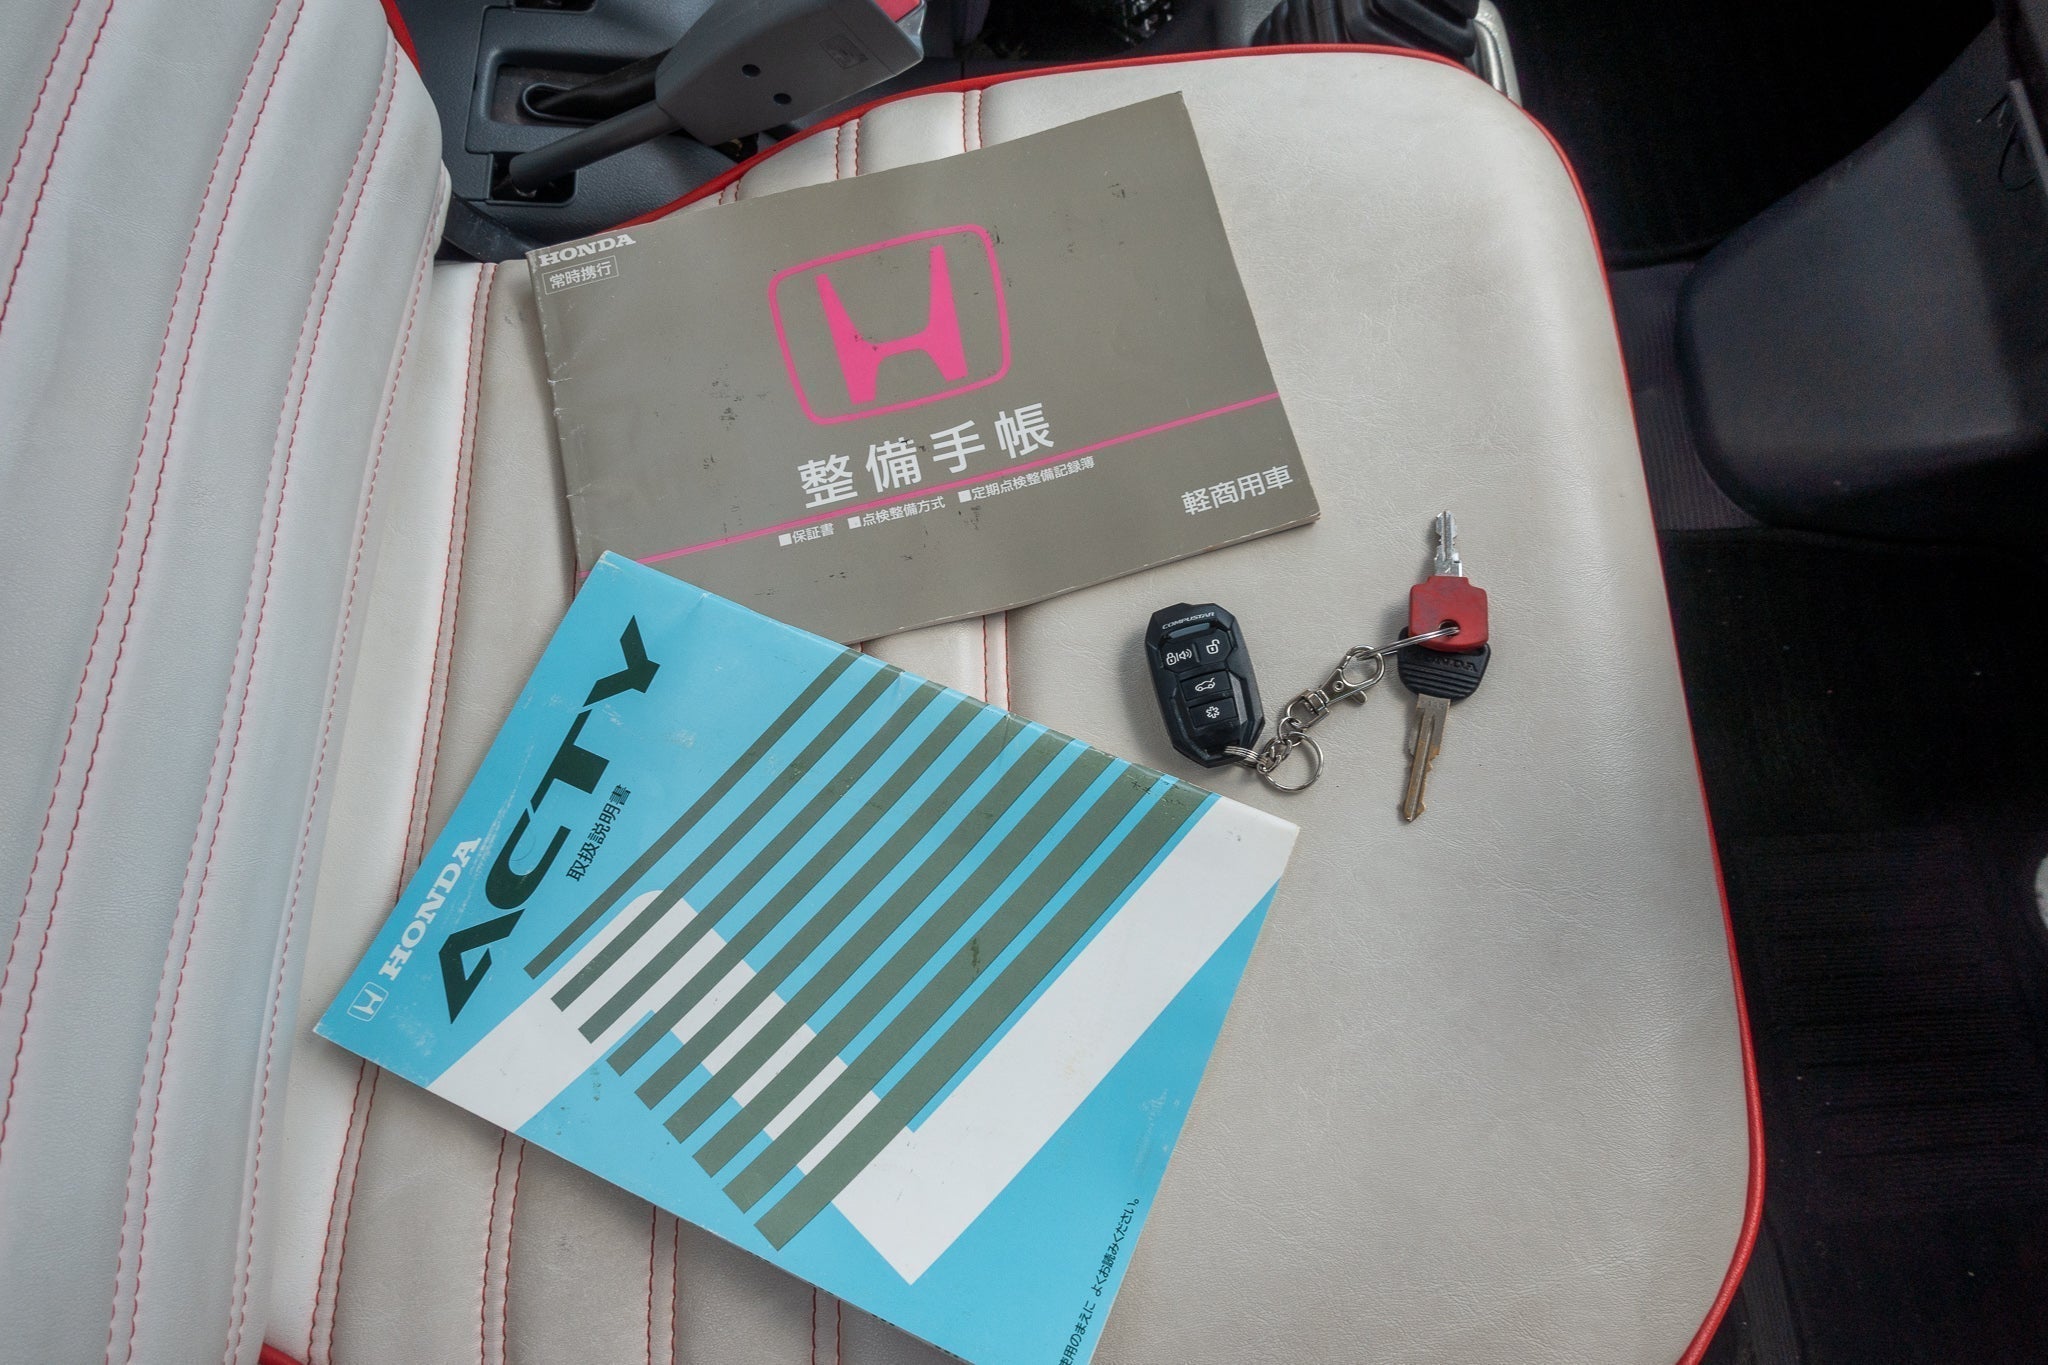
Honda Acty Maintenance Guide - Engine, Brakes, Transmission | OIWAGARAGE.CO

Filter Down
A Japanese Kei Truck on the road with an overlay of top insurance provider logos, showcasing the importance of proper coverage.
March 16, 2024

Mini Truck Insurance 101: Protecting Your Japanese Kei Truck with Style, Wit, and Top-Notch Providers

Discover everything you need to know about insuring your Japanese Kei Truck in our comprehensive guide. Explore top-notch insurance providers, policies, and tips to save on premiums while keeping your mini truck protected and stylish.

Read more

Ultimate Guide to Honda Acty Maintenance: Expert Tips for Engine, Brakes, and Transmission Care
March 16, 2024

Ultimate Guide to Honda Acty Maintenance: Expert Tips for Engine, Brakes, and Transmission Care


Honda Acty Kei Trucks: Understanding the Safety Aspects Before You Buy

 
SHOP KEI TRUCKS FOR SALE AT OIWA.CO - CLICK PHOTOWhen considering the purchase of a Honda Acty, a popular Japanese Kei truck, it's crucial to understand its safety features, or lack thereof, in comparison to modern vehicles. As an experienced driving and racing instructor at Summit Point Raceway and with significant experience at Bill Scott Racing (BSR) and NASA, I've seen firsthand the impact that safety features can have on vehicle performance.
It's important to note that the Honda Acty, both in truck and van models, falls short of modern safety standards. One of the most significant concerns is the absence of a substantial crash structure between the driver and oncoming vehicles. This, coupled with the lack of airbags, means that an accident which might be non-fatal in a modern airbag-equipped vehicle could lead to serious injury or even fatality in an Acty.
 
Another key safety feature missing in the Acty is the anti-skid brake system (ABS). In high-stress situations where a panic stop is required, the Acty's lack of ABS can result in all four tires skidding, leading to a loss of steering control and an increased stopping distance. My experience with both ABS-equipped and non-ABS vehicles in professional racing contexts has highlighted the crucial role ABS plays in maintaining control and minimizing stopping distances.
Given its small size, low weight, and absence of modern safety features like airbags and ABS, the Acty should be approached with caution. Its safety profile is more akin to riding a motorcycle, where external risks are significantly higher. 
 
Despite these concerns, the Acty remains a vehicle I enjoy driving, but it's essential for potential buyers to be fully aware of these risks. Always prioritize safety and ensure you're prepared for the Acty's unique driving experience.

Navigating the Registration Process for Honda Acty Kei Trucks: Key Insights for Buyers

 
SHOP KEI TRUCKS FOR SALE AT OIWA.CO - CLICK PHOTOUnderstanding the intricacies of registration is paramount when considering the purchase of a Honda Acty, a renowned Japanese Kei truck. The process can be complex, and buyers must approach it with caution. Here at OIWA, we've gathered crucial insights to guide you through the registration labyrinth, ensuring you make an informed decision.
First and foremost, it's essential to treat any unregistered Acty as strictly for off-road use, unless it's freshly imported with complete and verifiable paperwork. The reason is simple yet significant: if a seller could legally register the vehicle, they would have already done so to fetch a higher selling price. A registered Acty can command up to double the price of one limited to off-road use. Therefore, if a seller claims the vehicle is registrable, insist on them completing the registration before finalizing your purchase.
 
The registration process for a Honda Acty involves multiple documents from Japan, several of which require professional translation into English by a certified translation service. Additionally, certain U.S. states, often referred to as 'blue states', have regulations that may prohibit the registration of Acty trucks for street use. This makes it crucial to consult with your local Department of Motor Vehicles (DMV) prior to making a purchase decision.
A unique challenge with the Acty is its shorter-than-average Vehicle Identification Number (VIN), which can sometimes lead to registration denials. Many prospective buyers have faced setbacks underestimating the complexity of this process. To avoid such pitfalls, we strongly recommend opting for an Acty that's already registered and comes with license plates.
 
For those considering direct importation from Japan, engaging a professional import broker is a wise move. These experts can manage the vehicle's arrival at the port and handle all necessary paperwork for registration, simplifying the process for you.
However, if your intention is to use the Acty solely as an off-road vehicle on private property, negotiating a significant discount – around 50% less than a road-legal, registered Acty – is advisable.
 
In conclusion, while the allure of owning a Honda Acty is undeniable, navigating the registration process requires diligence and informed decision-making. At OIWA, we're committed to guiding you through these challenges, ensuring a smooth and transparent buying experience.

Decoding the Honda Acty Variants: A Guide to Importing the Right Kei Truck

 
Exploring the world of Honda Acty Kei trucks reveals a range of models, each with its unique features and specifications. If you're considering importing a Honda Acty, understanding these differences is crucial to making an informed choice. In this blog, we delve into the commonly imported Acty models, highlighting key aspects from the HA3 and HA4 to the earlier HA1 and HA2.
SHOP KEI TRUCK PARTS AND ACCESSORIES AT OIWAGARAGE.CO! CLICK PHOTO!The HA3 and HA4 Series (1990-1998): Balancing Power and Practicality
 
The HA3 and HA4 series, produced from 1990 to 1998, represent a blend of robust performance and practical design. Both models are equipped with front disc and rear drum brakes, ensuring reliable stopping power. A notable advancement in the 1996 and later Acty models is the introduction of fuel injection, enhancing engine efficiency and performance.
 
HA4 Specifications:
  • Engine: 660cc
  • Transmission: Manual 4/5 speed (no automatic option available)
  • Drive System: 4x4 with selectable 2-wheel rear drive
  • Wheel Lug Pattern: 4x100
HA3 Specifications:
  • Transmission Options: Manual 4/5 speed and automatic
  • Drive System: 2-wheel rear drive
The HA1 and HA2 Series (1988-1990): Classic Design with Robust Capabilities
 
For those who favor a classic aesthetic, the HA1 and HA2 series, produced from 1988 to 1990, offer a timeless design with round headlights. These models are known for their distinctive style, mirroring the body of the HA3 and HA4 but with a notable difference in their front appearance.
 
HA2 Features:
  • Engine: 550cc
  • Drive System: 4x4
  • Notable Design: Round headlights
HA1 Features:
  • Drive System: 2-wheel rear drive
  • Distinctive round headlights
Pre-1987 Models: Vintage Charm with a Challenge
The Honda Acty models from 1987 and earlier are for those who appreciate vintage charm. These trucks feature round headlights and are powered by a 2-cylinder 550cc motor. However, it's essential to note that parts for these older models are extremely difficult to find, presenting a challenge for maintenance and repairs.
 
In conclusion, whether you're drawn to the modern advancements of the HA3 and HA4 series or the classic appeal of the HA1 and HA2, understanding these variations is key to selecting the right Honda Acty for your needs. At OIWA, we're dedicated to helping you navigate the world of Kei trucks, ensuring you find the perfect match for your importing requirements.

Essential Guide to the Honda Acty Kei Truck: Key Features and Maintenance Tips

 
Understanding the nuances of your Honda Acty Kei truck is vital for optimal performance and longevity. This blog offers a comprehensive guide to the basic specifications and maintenance essentials of the Honda Acty, ensuring you get the most out of this versatile vehicle.
SHOP KEI TRUCK PARTS AND ACCESSORIES AT OIWAGARAGE.CO                                               CLICK PHOTOVIN Number and Engine Location
 
The VIN number, crucial for identification and registration purposes, is conveniently located beneath the driver's seat of your Honda Acty. The engine and transaxle, a combination of transmission and rear differential, are ingeniously situated under the truck bed, just forward of the rear axle. For easy access to the engine, there's a practical panel in the center of the truck bed.
 
Cargo Capacity and Tire Pressure Insights
 
Honda Acty boasts a cargo capacity of 350 kg (772 lbs), as indicated by the sticker on the rear of the truck. Tire pressure plays a significant role in vehicle handling and fuel efficiency. The recommended tire pressures are:
  • Standard: 26 PSI front, 29 PSI rear (some prefer 29 PSI for both front and rear).
  • With two passengers or over 100 kg (220 lbs) of cargo: 29 PSI front, 34 PSI rear.
  • Tire pressure measurements are also provided in BAR, with 1.8 front and 2.0 rear under standard conditions, and 2.0 front, 2.4 rear for heavier loads.
Refer to the tire pressure label on the driver’s door frame for guidance. The label displays pressure in kg/cm² or BAR. Factory tires typically have a 5-inch section width on 12-inch diameter rims, suitable for 4 ply ultra-light trucks, or a 145mm section width for 6 ply light trucks.
 
Spare Tire and Fuel Tank
The spare tire, a necessity for unforeseen roadside issues, is located under the bed/cab, just below the passenger seat. The fuel tank capacity is 9.8 gallons (37 liters), and it operates efficiently on 87 octane fuel.
SCHEDULE YOUR KEI TRUCK IMPORT CONSULT TODAY!
Jack Points and Towing Guidelines
For maintenance or emergency situations, the Honda Acty offers several jack points:
  • Front and rear axle beams, as per the manual.
  • Two metal protrusion jack points at the front corners.
  • Rear leaf suspension forward mounts, located just forward of the rear wheels.
If towing is necessary, particularly for four-wheel-drive models, it should not exceed 25 mph (40 kph) or cover long distances. The towing attachment hook is found below the front bumper license plate holder. Ensure the parking brake is released and the transmission is set to neutral. If your Acty features a 4WD-2WD selector bolt, it's advisable to switch to 2WD mode for towing.
At OIWA, we understand the significance of knowing your vehicle inside and out. This guide provides you with the essential information to maintain and enjoy your Honda Acty Kei truck. Whether for work or leisure, the Acty is a reliable and efficient choice, perfect for various needs. Stay informed and drive with confidence!

Mastering Maintenance: Essential Oil Change Tips for Your Honda Acty Kei Truck

 
Embarking on the essential task of changing the oil in your Honda Acty Kei truck ensures longevity and consistent performance. It's a straightforward process best undertaken after a drive when the engine, transmission, and differential oils are warmed up, optimizing flow and removal of impurities.
Optimal Engine Health with Regular Oil Changes
 
For the engine, 10w30 grade oil is ideal, with a capacity of 3 quarts (2.9 liters) if you're including a filter change, or 2.8 quarts (2.7 liters) without. In the frigid embrace of temperatures below -22 degrees Fahrenheit (-30 degrees Celsius), switch to 5w30 to maintain viscosity. The manufacturer recommends an oil change every 10,000km (6,250 miles) or biannually, but with a seasoned odometer surpassing 100,000km, a high-mileage synthetic blend like Castrol's offers the protective care your Acty deserves.
 
Finding the Right Fit: Oil Filters and Filling
When selecting an oil filter, the compact size is crucial for a snug fit. Compatible options akin to Honda's original part include the NAPA 1334 or its premium counterpart, the NAPA Gold 1358, as well as the Fram PH9688 and Mobile 1 M1-108A, all sharing the M20x1.5 thread size. [ Purchase Honda Acty Oil Filters At Oiwa Garage ] Before installation, a touch of clean oil on the filter gasket and threads ensures a perfect seal. While taller filters like the Bosch 3323 might tempt with their increased capacity, their vulnerability to road debris makes them a risky choice.
Locating the Essentials: Dipstick and Coolant Reservoir
Nestled behind the tire, the dipstick awaits your inspection, a simple check ensuring your Acty's engine oil level remains optimal. Although the coolant reservoir is out for a cleanse, its usual spot is adjacent to the battery box, a gentle reminder of the importance of coolant health in engine temperature regulation. This is crucial information to share with anyone borrowing your trusty Kei truck, alongside the location of the fuel and oil fills, to prevent any mix-ups that could lead to an unwelcome crankcase surprise.
The act of changing your Honda Acty's oil is more than a mere maintenance chore; it's a ritual that keeps the heart of your truck beating strong. With the right knowledge and tools, you ensure that every journey, no matter how rugged, is met with unwavering reliability.

Honda Acty Kei Truck Manual Transmission Fluid Replacement

 
For the discerning owner of a Honda Acty Kei truck, understanding the intricacies of manual transmission maintenance is crucial for ensuring the longevity and reliability of this compact powerhouse. At OIWA, we recognize the importance of regular upkeep, and we're here to guide you through the process.
SHOP KEI TRUCK PARTS AND ACCESSORIES AT OIWAGARAGE.COTranscending Transmission Care: Navigating Your Honda Acty's Gearbox
 
The heart of your Honda Acty's drivetrain, the 5-speed manual transmission, demands precision lubrication to operate seamlessly. We endorse the exclusive use of Honda's MTF (Manual Transmission Fluid) or, alternatively, an API SE 10w30 oil, with a capacity of 1.3 quarts (1.2 liters) for optimal performance. For those intent on a thorough cleanse, consider allowing a slight overflow during the refill process, ensuring any residual debris is purged from the transmission case.
 
Bolts and Beyond: Securing Your Transmission's Health
 
Locating the manual transmission fill and drain bolts can seem daunting, but they're accessible with a standard 3/8 inch ratchet wrench, which fits snugly into the square hole of the transmission drain bolt. Prioritize loosening the fill bolt before draining to avoid being stranded with an empty, yet unfillable, transmission.
Manual Transmission fill and drain bolts. PHOTO FROM ROBROBINETTE.COM
When tackling the fill and drain bolts, exert caution and strength – a hefty breaker bar may be necessary to break the initial resistance. While specific torque specs are elusive, an educated estimate of 7kgm should suffice when re-securing the bolts, ensuring a snug fit without risking damage.
Insight from OIWA: The Kei Truck Connoisseur's Choice
 
At OIWA, we're not just about sales; we're about empowering our customers with knowledge. Whether you're navigating the urban jungle or tending to rural demands, your Honda Acty is more than a vehicle; it's a statement of efficiency and versatility. Trust OIWA to keep you informed, equipped, and always ready for the road ahead.
 
Remember, your Kei truck is a marvel of Japanese engineering – treat it with the respect and care it deserves, and it will serve you faithfully for miles to come.

Optimizing Your Honda Acty's Front Differential: A Guide to Enhanced Longevity

 
Maintaining the front differential of your Honda Acty is crucial to ensuring the longevity and performance of your kei truck. For those who treasure their Acty's off-road capabilities, using the right gear oil is non-negotiable. 
API GL-4 75w85 gear oil is recommended, with a capacity of 0.48 quarts for a standard change. However, for a robust solution, consider Lucas GL-4 GL-5 full synthetic 75w90 gear oil, which not only meets but exceeds GL-4 specifications.
 
When changing the oil, a trick to enhance the cleaning process is to introduce a bit of fresh oil into the differential case with the drain bolt removed. This helps in flushing out any residual grime. Following this, replace the drain bolt and carefully fill new oil through the fill hole until it begins to overflow, indicating full capacity.
For those tackling this task, a standard 3/8 ratchet wrench is the perfect fit for the differential's square drain bolt. Exercise caution and ensure the fill bolt is loosened before draining begins. In instances where the bolts are particularly tight, a larger breaker bar may be necessary to loosen them effectively. While exact torque specifications for the manual transmission and front differential fill and drain bolts may be elusive, aiming for 7kgm is a commonly accepted practice.
By adhering to these maintenance tips and using high-quality gear oil, you can significantly extend the life of your Honda Acty's differential, ensuring it continues to navigate challenging terrains with ease.

Power Up Your Honda Acty: Selecting the Right Battery for Peak Performance

 
When it comes to ensuring your Honda Acty kei truck starts reliably, choosing the appropriate battery is vital. Many Honda Acty owners have discovered that a U1 size generic lawn and garden tractor battery is a cost-effective and efficient choice. 
Retailers like Walmart and Tractor Supply offer the U1-340 model, which, at approximately $40, delivers a robust 340 CCA (cold cranking amps). This power level is more than sufficient for the Acty's requirements.
 
The U1 battery's terminal alignment is conveniently compatible with the Acty's setup, allowing the original hold-down bar to be utilized without issue. However, you might need to gently widen the Acty's battery terminals with pliers to accommodate the new battery's fit (as shown in a referenced photo). 
Additionally, for optimal securing of the shorter-than-standard battery, the hold-down J-bolts may need adjustment to their lower holes.
 
For those seeking a direct replacement, the 36B24R battery available from suppliers like Alibaba is an exact match, down to the factory terminal size, ensuring a seamless transition. Investing in the right battery not only guarantees reliable ignition but also contributes to the overall electrical health of your kei truck, making it a crucial aspect of vehicle maintenance for peak performance.

Optimizing Your Honda Acty: A Guide to Selecting the Ideal Tires

 
For the Honda Acty kei truck enthusiasts who want to ensure their vehicle's agility and safety on any terrain, choosing the right tires is crucial. The standard tires for this compact powerhouse are typically LT145/80R12 6 ply radials, offering a balance of durability and performance with a 21.2" diameter. 
An alternative size that can be considered is 155/70R13, coming in at a slightly larger 21.5" diameter.
 
Those looking to upgrade can consider the Nankang CX668 155/80R12 tires. With a diameter of 21.8", a wear rating of 440, and mud & snow (M+S) rating, they offer enhanced traction for diverse driving conditions. Available on Amazon for about $35 each or $259 for a set of four installed at Discount Tire, they're a smart choice for highway driving and fit seamlessly on the Acty's stock 12" wheels.
 
Another excellent option is the Bridgestone 604V RD-604 145R12 6PR, which maintains the stock wheel fit and can be sourced from eBay for $369 for a set of four, shipping included.
For those who tread off the beaten path, the Sun F All 22x7x12 off-road tires are compatible with the Acty's standard wheels and can be found on Amazon at $61 each, with shipping included.
For the ultimate off-road traction, the Carlisle Tru Power and Farm Specialist R1 23x6x12 tires are unbeatable. Available for around $65 each on Amazon, they're a favorite among off-road enthusiasts.
 
Whatever your preference or driving needs, OIWA has you covered with a range of tire options that will keep your Honda Acty performing at its best, whether you're navigating city streets or rural trails.

Upgrading Your Honda Acty's Wheels: A Strategic Guide for Enhanced Performance

 
For Honda Acty kei truck owners, the wheels are a fundamental aspect that can significantly influence your truck's aesthetics and functionality. 
Typically, the Acty comes equipped with 12x3.5" wheels, boasting a 4x100 lug pattern, or the slightly larger 13x4" variant, both featuring a precise 56.1mm center bore hole for a snug hub fit.
 
The factory wheels offer a generous 100mm (3.9") backspacing, ensuring approximately 1" clearance from the coil springs when paired with standard tires, providing a balanced and secure ride.
 
For those looking to customize their Acty, wheel adapters are a game-changer. They open up a new world of possibilities, allowing the fitment of more ubiquitous 4x114.3 wheels. For instance,
 
 a set of four 1" (25mm) thick Wheel Adapter Spacers can be procured from Amazon for about $58, converting a 4x100 to a 4x114.3 pattern with M12x1.5 lugs. These adapters effectively add an inch to both positive offset and backspacing.
When it comes to upsizing, with a 1" 4x114.3 adapter in place, owners can fit bold 14x7 +13 offset Fuel Maverik wheels wrapped in 23x9.5x14 inch tires for an assertive stance. Moreover, 14x6 +30 offset wheels with 175/65/14 tires offer a no-lift, no-rubbing solution, maintaining the truck's low profile while enhancing its road presence.
Lastly, securing your new wheels with the right lug nuts is paramount. For the Acty, M12x1.5 lug nuts are the perfect match, readily available on Amazon.
 
At OIWA, we understand that every detail counts. That's why we're committed to providing our customers with the insights they need to make informed decisions about their vehicle upgrades. Whether you're looking to enhance your Honda Acty's performance or its street appeal, we've got the expertise to guide you every step of the way.

Essential Guide to Honda Acty Brake Maintenance for Enhanced Safety

 
Maintaining the brake system in your Honda Acty kei truck is crucial for ensuring your vehicle's safety and performance. Front brake calipers and disks are among the components that may require attention during the vehicle's lifespan. 
When it's time to replace the front brake pads, start by locating the 12mm caliper release bolt, which, once removed, allows the caliper to swing upward. This action will enable you to slide out the old pads easily.
 
Before you can fit the new, thicker brake pads, it's necessary to retract the brake piston. This can be done using a C-clamp or a specialized brake piston compressor tool, which will create enough space for the caliper to fit over the new pads. It's important to note that pushing back the brake piston may cause the brake fluid reservoir to overfill. 
To prevent any overflow, it's wise to check and potentially remove some brake fluid from the reservoir after compressing each piston, especially after completing the first one.
If you're also looking to remove the brake disk, the process involves detaching the caliper and its bracket by unscrewing the two hefty 17mm bolts that secure the bracket to the knuckle. 
The brake disk itself is fastened with two Phillips head screws, which can be swiftly removed with an impact driver. Due to the screws' soft metal composition, if they prove stubborn, drilling them out is a viable option to free the disk. Sometimes, a gentle tap with a rubber mallet may be necessary to loosen and remove the disks.
 
At OIWA, we're dedicated to empowering Honda Acty owners with the knowledge to perform routine maintenance safely and effectively. By following this guide, you can ensure your Acty's brakes are in top condition, keeping you and your cargo secure on every journey.

Maximizing Your Honda Acty's Potential: The Pros and Cons of a 2-Inch Lift Kit

Elevating your Honda Acty with a 2-inch lift kit can offer a fresh look and the capability to fit larger wheels and tires, but it's not a decision to take lightly. Priced around $200 on eBay, the lift kit can indeed give your kei truck a more robust stance. 
However, be aware that such modifications can raise the vehicle's center of gravity, which may increase the risk of rollovers. Furthermore, a lifted Acty can exert additional stress on the CV joints, potentially leading to accelerated wear and tear.
 
For those set on installing a lift kit, the process involves some careful steps:
  1. Begin by removing the front seats to access the strut tower nuts.
  2. Jack up the Acty's front end at the center brace to lift both wheels simultaneously, then secure with jack stands.
  3. Proceed to remove one wheel at a time.
  4. Detach the brake line bracket from the strut to allow for movement during suspension work.
  5. Unfasten the three strut top hat nuts located beneath the seats (watch for insulation or carpet in an Acty van that might cover these).
  6. Support the wheel hub with tie-wraps or a bungee cord to prevent straining the brake line while you handle the strut.
  7. Install the lift spacers and then reassemble the struts, making sure the spacer studs align correctly before tightening the top hat nuts.
  8. Reattach the brake line bracket to the strut – this step is crucial, so double-check it.
  9. Repeat the process for the other side, ensuring all components are secure before reattaching the wheels.
For the rear lift:
  1. Jack up the rear of the Acty, ensuring the tires are just touching the ground to relieve tension on the leaf springs.
  2. Remove and replace the leaf spring support brackets with the extended versions provided in the kit.
Keep in mind that a front-end alignment will be necessary post-installation to correct the toe-in and prevent uneven tire wear, as the rear wheels are not adjustable.
While a 3-inch lift kit is on the market, it requires more extensive modifications and isn't recommended for the casual user. If you're considering a lift for your Honda Acty, approach it with caution, understanding the changes in dynamics it brings to your vehicle.
 
For those who prefer their Acty closer to the ground, OIWA offers a wide selection of original-spec parts and accessories to maintain and enhance your vehicle's performance without altering its factory design.

Revitalizing Your Honda Acty: Front Spring Upgrade Guide

When the rough terrain becomes a challenge for your Honda Acty, it may be time to consider refreshing your mini truck's suspension with new front springs. 
Here's your step-by-step guide to revitalizing your Acty's bounce, ensuring it handles those bumps with ease.
First, recognize that worn-out struts can lead to the front end bottoming out. While original Honda replacements can be costly, sourced directly from Japan, there are more economical options. 
Aftermarket solutions, like GAZ coilover struts, offer a premium but pricey alternative. 
For those seeking a budget-friendly fix, replacing the front springs is your best bet. Opt for springs that are 10 inches long, 2.5 inches in diameter, and a weight class that suits your needs—275 lbs is a common choice. 
Now, the task at hand—installation. You'll need a spring compressor, so ensure you have one on hand. Begin by removing the front seats to access the strut tower nuts. Jack up the Acty's front using the central brace, lifting both wheels off the ground. Secure with jack stands.
After wheel removal, apply penetrating oil to the sway bar end link nut and other related components. Disconnect the sway bar end link to ease spring swapping—this is crucial as it reduces tension. Also, detach the brake line bracket from the strut for better suspension mobility.
If you're also replacing the struts, loosen the clamp bolt at the strut's base. Otherwise, focus on the three strut top hat nuts beneath the seats. Be ready to catch the strut when the last nut is free, but leave the central strut shaft nut for now.
With the strut removed, you can take off the top hat and spring. Remember the assembly order, and consider using a ViceGrip with duct tape to avoid damaging the strut shaft. Replace the old spring with the new one, compress it with the spring compressor, and reassemble the strut.
Once the strut is back in place, reattach the brake line bracket and sway bar end link, ensuring all parts are secure. Repeat on the other side, then finish up by reinstalling the wheels and taking your Acty for a test drive.
An important note: if your Acty's ride height changes significantly after the spring upgrade, you may need a front-end alignment to ensure proper toe-in and prevent uneven tire wear.
By following these steps, you can ensure your Honda Acty remains a reliable and sturdy partner for all your hauling needs. 
And remember, for all your mini truck parts and expertise, OIWA is here to help you navigate maintenance and upgrades with ease.


Mastering Rear Brake Drum and Wheel Bearing Maintenance on Honda Acty Kei Trucks

SHOP KEI TRUCKS FOR SALE AT OIWA.CO - CLICK PHOTOEdit Image
Maintaining the rear brake drum and wheel bearings of your Honda Acty is crucial for optimal performance and safety. For those keen on DIY maintenance, here's a comprehensive guide on how to tackle this task effectively, highlighting the use of Timken 6206-2RS double rubber sealed wheel bearings, ideal for both the truck and van models of the Acty.
Firstly, begin by removing the rear wheel to access the axle nut cover at the center of the brake drum. A pro tip: loosening the axle nut is more manageable with the tire on the ground, so you may want to temporarily put the wheel back on and lower the Acty. Next, remove the axle nut cotter key. For this task, arm yourself with a substantial, long breaker bar to loosen the axle nut, and remember, you'll also need a hefty torque wrench for reinstallation.
Once the rear wheel is off again, employ a puller – such as the Maddox $90 Slide Hammer & Puller Set – to detach the brake drum. This set is incredibly versatile, offering both pullers and a slide hammer to simplify the process. With the axle nut and cotter pin removed, attach the puller to the rear hub/drum. As you tighten the center shaft, it will push against the drive shaft, effortlessly pulling the hub off.
Accessing the brake shoes and wheel bearings becomes straightforward with the hub removed. Using the bearing puller claw attached to the slide hammer shaft, grip the wheel bearing and use forceful sliding motions to extract the bearing. This step might require a bit of elbow grease, but persistence pays off.
Once the old bearing is out, it's time to install the new one. We recommend the high-quality Timken 6206-2RS wheel bearings, which are pre-greased and fit both the front and rear of the Acty. Use the bearing pusher, ensuring it contacts the outer race of the bearing, to smoothly slide the new bearing into place.
Remember, applying pressure on the inner race can damage the new bearing.
For those who prefer an alternative method, a two-jaw puller grabbing two lug nuts can also be employed to remove the brake drum, especially after the large axle nut has been taken off.
After reassembling, it’s crucial to torque the axle nut to the precise specification of 20kg/m or 145 lb-ft and reinstall the cotter pin. This attention to detail ensures your Acty’s wheel bearings and rear brake drum are maintained to the highest standard, enhancing both the longevity and safety of your vehicle.
 
In summary, maintaining your Honda Acty’s rear brake drum and wheel bearings is a task within reach for the dedicated DIY enthusiast. With the right tools and a bit of know-how, you can ensure your Acty remains in top condition, ready for any adventure or task it faces. For more insights and expert advice on maintaining your Honda Acty, stay tuned to OIWA’s comprehensive blog series.


Expert Guide to Brake Fluid Maintenance in Your Honda Acty Kei Truck

 
Brake Fluid Maintenance For Your Honda Acty Kei TruckEdit Image
Maintaining the brake fluid in your Honda Acty Kei Truck is essential for ensuring its safety and reliability. Conveniently located behind a pop-off panel on the dashboard's right side, the brake master cylinder is easily accessible. Open the driver's door to find the panel on the dashboard's side.
Honda Acty's manufacturer recommends using either DOT 3 or 4 brake fluid, but I lean towards DOT 4 for its higher boiling point and better performance. The key to an effective brake fluid change lies in the bleed order: start with the right rear, then the left rear, followed by the right front, and finally, the left front.
For those planning a complete fluid flush, use a mechanic's syringe to remove as much old fluid from the reservoir as possible. Refill it with fresh brake fluid before commencing the bleeding process. It's crucial to avoid letting the reservoir run too low during bleeding to prevent air from entering the brake system.
To bleed the brakes, remove the rubber cover from the brake bleed nipple and attach a clear plastic hose to it, directing the other end into an empty bottle. 
Have an assistant apply pressure to the brake pedal while you open the brake bleed nipple. 
This action will send the brake fluid through the tube, with the pedal reaching the floor. 
Keep the pedal down until you've closed the nipple. Then instruct your assistant to release and reapply pressure on the pedal as you open the nipple once more. Repeat this process until fresh, clean brake fluid emerges from the nipple. Regularly check and top up the brake fluid reservoir during this process to prevent air intake.
Once you observe new, clear fluid exiting the bleeder, secure the nipple, replace the rubber cover, and proceed to the next wheel in the sequence.
Remember, the brake master cylinder and its reservoir are just behind the access panel, which can be easily removed with a gentle pull. Regular brake fluid maintenance is not just about performance; it's about ensuring the safety of every journey in your Honda Acty Kei Truck. Stay tuned to OIWA for more insightful maintenance tips and tricks for your beloved Kei truck.


Optimizing Your Honda Acty's Performance: Key Insights on Air Filter Replacement

 
When it comes to maintaining your Honda Acty Japanese Kei truck, one crucial aspect to consider is the air filter. A clean and efficient air filter is vital for optimal engine performance and longevity. If you're in the market for a new air filter, purchase THIS ONE  from OIWAGARAGE.CO.
Conveniently located at the rear of your Acty, just above the exhaust system, the air filter is easily accessible for maintenance or replacement. 
You'll find three spring clips securing the air filter cover. Once these clips are disengaged, you can easily remove the cover to access the filter.
SHOP KEI TRUCKS FOR SALE AT OIWA.CO TODAY - CLICK PHOTO
The process of replacing the air filter is straightforward. After opening the cover, you will see a wing nut that holds the air filter in place. Unscrewing this nut allows you to remove the old filter and replace it with a new one.
Regularly checking and replacing the air filter in your Honda Acty is a simple yet effective way to ensure that your truck runs smoothly. This small maintenance task can have a significant impact on the overall health of your vehicle, enhancing fuel efficiency and engine performance.
Stay updated with more maintenance tips and insights on optimizing your Honda Acty for peak performance with OIWA. Our series provides comprehensive guides to help you keep your Kei truck in top condition.
 

Essential Maintenance: Replacing the Honda Acty's Fuel Filter

Keeping your Honda Acty in top shape requires attention to many small details, one of which is the fuel filter. According to the service manual, it's advisable to change the fuel filter every 24,855 miles (40,000 kilometers). This routine maintenance can be crucial for the longevity and efficiency of your vehicle.
To undertake this task, you'll need a pair of pliers to gently shift the fuel line clamps away from the filter. Once that's done, both fuel lines need to be removed. A wide flat-blade screwdriver can be quite handy for this step. However, it's important to exercise caution to avoid any damage to the lines.
Once the lines are disconnected, the filter can be nudged up and out from its holder. For the replacement part, purchase THIS ONE avaliable at OIWAGARAGE.CO.
Underneath the truck bed, you'll find the fuel pump and the fuel filter. Positioned near the bottom right is the fuel tank. 
Keep in mind, you may need to adjust the small 2-way valve above the filter to smoothly extract it from its holder.
Remember, regular maintenance, including timely replacement of the fuel filter, is key to ensuring your Honda Acty runs smoothly and reliably. Stay tuned to OIWA for more insightful tips and advice on maintaining your Honda Acty, ensuring you get the most out of your Japanese Kei truck.


Optimizing Your Honda Acty: Mastering Idle Adjustments

 
For Honda Acty owners, fine-tuning the idle settings can significantly enhance your vehicle's performance. 
These adjustments are crucial, especially when dealing with variations in engine behavior due to different loads or air conditioning use. Here's a step-by-step guide to adjusting the idle speed and mixture on your Honda Acty, ensuring it runs smoothly under all conditions.
Firstly, you need to access the carburetor. This involves removing the white plastic carburetor cover located on top of the engine. You can reach this through the engine access panel in the truck bed. Before making any adjustments, it's important to note the original positions of the screws.
 This initial setup acts as a fallback in case you need to reset the adjustments.
The idle adjustment involves two key components: the idle screw and the mixture screw. The idle screw controls the opening and closing of the carburetor butterfly, essentially regulating the engine's idle speed. Adjusting this screw will either increase or decrease the engine's RPM when idling.
Next comes the mixture screw setting. Ideally, the optimal setting for the mixture screw is where you achieve the highest RPM during idle. 
This ensures a balanced fuel-air mix, contributing to smoother engine performance.
If you notice your Acty stalling or sputtering when the air conditioning is activated, it might be necessary to tweak the AC idle setting. 
This helps the engine compensate for the extra load imposed by the air conditioner.
To sum up, adjusting the idle speed at the top left, the idle mixture below, and the AC idle on the right can lead to noticeable improvements in your Honda Acty's performance. 
Remember, precision is key – a slight turn can make a big difference. Stay connected with OIWA for more expert insights and tips on maintaining your Honda Acty to its peak potential.
 

Essential Maintenance Guide: Flushing the Honda Acty Cooling System

 
Maintaining the cooling system of your Honda Acty is crucial for ensuring its longevity and performance. This detailed guide will walk you through the process of flushing the cooling system, an essential task for any Honda Acty owner.
Coolant Requirements: Your Honda Acty requires 5.3 quarts (5 liters) of coolant. If your model has an automatic transmission or a rear heater, the requirement increases slightly. It's recommended to use a mix of 30% coolant (1.6 quarts) and 70% distilled water. In colder climates, a 50% coolant mixture is advisable.
Preparation Steps: Before flushing, set your cab heater control to full hot to ensure the heater's coolant is included in the process. Locate the radiator at the front, behind the bumper. The radiator cap and drain cock are accessible from the cab, on the passenger side. 
Remember to replace the o-ring of the drain cock whenever it's opened. For thorough flushing, also remove the engine block drain bolt, located above the oil filter.
Engine Block Drain Bolt: Located just above the oil filter, this bolt plays a vital role in draining the coolant from the engine block. Be sure to replace the crush washer and torque it to 4-5kgm. Squeezing the coolant hoses helps in releasing air from the system.
Coolant Reservoir Management: You'll find the coolant reservoir adjacent to the battery. It's removable for easy cleaning. After flushing, refill it to the "MAX" line with coolant, ensuring the cap is securely replaced.
Refilling the Radiator: Post-drainage, seal the engine block drain bolt and radiator drain cock. Use a long-neck funnel to add coolant, followed by distilled water, ensuring the correct mixture. If using pre-diluted coolant, fill the radiator and reservoir accordingly. Run the engine until it reaches a low idle, indicating the thermostat is open and coolant is circulating.
Bleeding the Cooling System: Air bubbles in the system can cause hot spots in the engine. While the engine runs, squeeze the coolant hoses near the battery box and radiator to move air bubbles. After cooling, top off the radiator with more coolant. Pay attention to the four bleeder bolts for air release.
Coolant Line Bleeder Bolts: These bolts are located above the spare tire (remove tire for access) and on the engine (accessible by removing the bed panel). Open each bolt until coolant flows out, then close them.
Post-Maintenance Checks: After performing these steps, inspect for leaks and ensure the coolant reservoir is between the "MIN" and "MAX" lines. Before your next drive, check the radiator and reservoir levels again.
Thermostat and Water Pump Considerations: The thermostat, located at the bottom of the engine block, should be replaced alongside its o-ring whenever removed. The water pump, driven by the timing belt, should also be checked for leaks and replaced as needed, especially during timing belt changes.
By following these steps, you can ensure your Honda Acty’s cooling system operates efficiently, safeguarding your engine's health. For more insightful tips and vehicle maintenance advice, stay tuned to OIWA's expert blog series.
 

Optimizing Your Honda Acty's Performance: Thermostat Replacement Guide

When it comes to maintaining the efficiency and reliability of your Honda Acty, paying attention to the thermostat is crucial. Situated within the thermostat housing at the engine block's base, where two hefty coolant hoses converge, this component plays a pivotal role in engine temperature regulation.
Replacing the Thermostat: The process of replacing the thermostat is straightforward yet significant for the health of your Acty. The thermostat cover, secured by three bolts, needs to be unfastened with a torque of 1kgm. It's imperative to replace the thermostat housing o-ring every time this housing is detached to ensure a perfect seal.
Post-Replacement Steps: Once you've installed the new thermostat, it's essential to refill the coolant system. Follow the detailed steps outlined in our cooling system bleed procedure to ensure no air pockets are trapped within the system, which could affect its efficiency. After running the engine to a warm state, check for any potential leaks that could compromise the system's integrity.
As the engine cools down post-operation, remember to top off the radiator once more to maintain the correct coolant level. This ensures your Acty's engine runs smoothly and remains at an optimal temperature.
Where to Find Replacement Thermostats: Finding a replacement thermostat for your Honda Acty is a breeze. O'Reilly Auto Parts stocks thermostats compatible with the Acty, ensuring a perfect fit and optimal functionality. For instance, a 1990 Acty would require a thermostat with the part number 3758, typically priced around $6 – an affordable investment for maintaining your vehicle's health.
In conclusion, regular checks and timely replacement of your Honda Acty's thermostat not only enhance its performance but also prolong the life of your engine. Stay updated with more valuable insights and maintenance tips on OIWA's comprehensive blog series dedicated to Honda Acty Japanese kei trucks.
 

Honda Acty Timing Belt Replacement: A Crucial Maintenance Guide

 
Honda Acty Timing Belt Replacement: A Crucial Maintenance Guide
When it comes to maintaining your Honda Acty, one of the most critical tasks is the timely replacement of the timing belt. According to the manufacturer's manual, it's recommended to replace the timing belt no later than every 100,000 kilometers (approximately 62,000 miles) or every seven years. Delaying this replacement can lead to severe engine damage, where the pistons and valves collide, often resulting in costly repairs or even necessitating a complete engine replacement.
Proactive Maintenance Strategy: Consider replacing the timing belt earlier if you're servicing other related components. For instance, if you're replacing the alternator belt at around 68,000 kilometers, it’s sensible to address the timing belt simultaneously. This approach not only saves time but also ensures that all
critical components contributing to the engine's timing are in optimal condition.
Comprehensive Replacement: When replacing the timing belt, it’s crucial to address other associated components to ensure a thorough overhaul. This includes the timing belt tensioner, idler pulley, water pump, and the water pump o-ring. Additionally, consider replacing the alternator belt and the air conditioning compressor belt. Cam and crank seals are also vital components that should not be overlooked.
Detailed Replacement Process: To access the timing belt, you'll need to remove the cylinder head cover and all belt covers on the engine's passenger side. The process involves removing the passenger side engine mount. When lifting the engine with a jack, take care to protect the oil pan with a rubber pad or cloth to prevent damage.
Setting the Engine to Top-Dead-Center (TDC): The #1 cylinder should be set to top-dead-center. This is done by aligning the TDC marks on the crankshaft pulley and engine block, along with ensuring the "UP" label on the cam sprocket is correctly positioned. It's crucial to note this alignment for accurate installation of the new timing belt.
Timing Marks Alignment: Ensure the small notch on the rim of the crank pulley (indicating the timing side mark) is aligned with the corresponding engine block mark. The two marks on the cam gear should align with the top line of the engine cylinder head. After installing the new timing belt, verify that all the marks are still aligned and tensioned correctly. Rotate the crankshaft two full turns (720 degrees) to confirm the timing marks align again.
Final Steps and Precautions: After loosening the timing belt tensioner bolt, slide the timing belt off. Proceed to replace the tensioner, idler pulley, water pump, and o-ring. Be prepared for coolant loss when removing the water pump. 
 
Once the new timing belt is installed, double-check the crankshaft and camshaft pulley positions against the TDC marks. The idler pulley and tensioner bolts should be torqued to 4.5kgm. If the Acty struggles to start or runs roughly post-replacement, recheck the belt positioning and cylinder alignment.
 
In conclusion, timely and precise replacement of the timing belt in your Honda Acty is essential for maintaining its performance and longevity. This task, although intricate, is crucial for ensuring the smooth operation of your vehicle.
Stay tuned to OIWA's blog series for more insightful tips and guidance on maintaining your Honda Acty Japanese kei truck.
 

Essential Guide to Replacing the Honda Acty's Alternator Belt

 
Maintaining the reliability and performance of your Honda Acty involves regular checks and replacements of key components, one of which is the alternator belt. This critical element of your vehicle's functionality is often overlooked until issues arise. However, timely replacement and proper maintenance can save you from unexpected breakdowns and costly repairs.
Standard Size for Easy Replacement: The alternator belt for the Honda Acty is a standard size, measuring 10mm x 675mm. This size is readily available at most auto parts stores, making it convenient for Acty owners to source a replacement. The manufacturer’s manual recommends replacing the alternator belt at intervals of approximately 68,000 kilometers (42,000 miles), ensuring optimal performance and longevity of your vehicle's electrical system.
Checking Belt Condition and Tightness: The Honda Acty features a large inspection grommet on the belt cover, allowing for easy checks of the belt's condition and tightness. 
Regular inspection is crucial to identify any signs of wear or damage early, preventing potential failures while on the road. When checking the belt tightness, it should be done with a gauge set to 20-30kgf, allowing for a travel range of 9-12mm. 
This ensures the belt is neither too tight, causing undue strain and wear, nor too loose, leading to slippage or inefficient charging.
By keeping up with these simple but essential maintenance tasks, you can significantly enhance the performance and reliability of your Honda Acty. Regular checks and timely replacements of the alternator belt are key to avoiding electrical system issues and ensuring your kei truck runs smoothly.
For more insights and detailed maintenance tips on your Honda Acty and other Japanese kei trucks, stay tuned to OIWA's blog series. We’re dedicated to providing you with expert advice and the latest information to keep your kei truck in peak condition.
 

Maximizing Honda Acty's Performance: AC Compressor Belt Replacement Guide

 
Ensuring your Honda Acty runs smoothly includes maintaining its air conditioning system, which is essential for comfortable driving experiences, especially in warmer climates. A critical component of this system is the Air Conditioning (AC) Compressor Belt. Regular checks and timely replacements can greatly impact the efficiency and longevity of your vehicle's air conditioning system.
Optimal Replacement Intervals: For optimal performance, it is recommended to replace the AC Compressor Belt in your Honda Acty at intervals of around 68,000 kilometers (42,000 miles), which aligns with the replacement schedule of the alternator belt. This regular maintenance ensures that the air conditioning system operates efficiently and reduces the risk of belt failure that could lead to more significant issues.
Belt Tension Specifications: When installing a new AC Compressor Belt, the tension should be set between 35-60kgf. However, if you're adjusting a used belt, the tension should be maintained within the range of 22-40kgf. Correct tensioning is crucial for the belt’s performance and durability, as an overly tight belt can cause excessive wear, while a loose belt might lead to slippage and inefficient operation.
Air Conditioning Fluid Check: In addition to replacing the AC Compressor Belt, it's important to check the AC fluid. Regular checks can identify potential leaks or fluid depletion, which can affect the cooling efficiency. Maintaining the right level of AC fluid ensures your system operates at peak performance, keeping the cabin cool and comfortable.
Compatibility for Air Conditioning Drier Replacement: For those driving a Honda Acty and looking to replace the air conditioning drier, there's good news. The drier from the 1988 Honda Civic is a perfect fit for the Acty. This compatibility offers a convenient solution for Acty owners, ensuring easy sourcing and replacement.
Remember, regular maintenance of your Honda Acty’s AC system, including timely belt and drier replacements, is key to enjoying a comfortable and reliable ride.
For more expert advice and maintenance tips on the Honda Acty and other Japanese kei trucks, keep following OIWA's blog series. We’re committed to providing you with the latest insights and practical guidance to keep your kei truck in top condition.
 

Optimizing Your Honda Acty: The Essential Guide to Spark Plug Maintenance

 
Maintaining the heart of your Honda Acty involves attention to small but vital components, like the spark plugs. These tiny parts play a critical role in your vehicle's performance, affecting its efficiency and smooth operation. For Honda Acty owners, understanding the nuances of spark plug maintenance is key to ensuring your kei truck runs at its best.
Number and Type of Spark Plugs Required: Your Honda Acty requires three spark plugs. The recommended types are NGK BKR6E-11, ND K20PR-U11, or the Champion Iridium 9001. These specific models are chosen for their compatibility and performance with the Acty's engine, ensuring optimal combustion and efficiency.
Spark Plug Gap Setting: Setting the correct gap on your spark plugs is crucial for proper ignition and performance. For the Honda Acty, the ideal spark plug gap is set between 1 - 1.1 mm. This precise gap ensures that the spark plugs fire correctly, contributing to the smooth running of your engine.
Accessing the Spark Plugs: To reach the spark plugs, you'll need to access the engine beneath the truck bed. This is done by removing the engine access panel, which is secured by four 14mm bolts. A visual guide can be seen in the engine photo above. Once the panel is removed, you'll have clear access to the spark plugs.
Additional Step for Easier Access: For a more convenient spark plug change, especially for the #2 spark plug, it's advisable to remove the throttle cable support bracket. This requires undoing just one 10mm bolt and provides additional room to maneuver and efficiently replace the spark plug wire.
Regular checks and replacements of your Honda Acty’s spark plugs are integral to the vehicle's performance. Keeping these components in top condition ensures your Acty runs efficiently and reliably.
Stay tuned to OIWA's blog for more practical tips and expert advice on maintaining your Honda Acty and other Japanese kei trucks. We're dedicated to helping you keep your vehicle in pristine condition with the latest, most effective maintenance strategies.


Enhancing Visibility: Selecting the Right Windshield Wipers for Your Honda Acty

 
WIPER ARM - LEFT - HONDA ACTY TRUCK HA1, HA2, HA3, HA4 MODELS - 1990-1999                  SHOP AT OIWAGARAGE.CO - CLICK PHOTO
When it comes to maintaining your Honda Acty, even the smallest details like windshield wipers play a significant role in ensuring a safe and comfortable driving experience. In this guide, we’ll delve into the specifics of choosing the ideal windshield wipers for your Honda Acty, ensuring clear visibility in all weather conditions.
Optimal Size for Front Wipers: The front windshield wipers of the Honda Acty are conveniently compatible with standard 15-inch wipers available at any auto parts store. This universal size makes it easy to find replacements, keeping your windshield clear and your visibility unobstructed.
Customization for Tall Drivers: For drivers who are taller and require a broader sweep of the windshield, a 16-inch wiper blade can be fitted on the driver’s side. This slight increase in size can make a substantial difference, offering an enhanced field of vision by clearing the top part of the windshield more effectively.
Rear Wiper for Honda Acty Van: Owners of the Honda Acty van should note that the rear wiper uses a standard 13-inch blade. This size ensures that the rear vision is as clear as the front, providing comprehensive visibility around the vehicle.
By equipping your Honda Acty with the correct size and high-quality windshield wipers, you can significantly improve your driving experience, especially under challenging weather conditions. Remember, regular replacement of wiper blades is key to maintaining optimal visibility and safety on the road.
For more insightful tips on maintaining your Honda Acty and other Japanese kei trucks, keep following the OIWA blog. Our aim is to empower you with knowledge and advice to keep your vehicle performing at its best.
 

Seamless Radio Upgrade for Your Honda Acty: A DIY Guide

 
Upgrading the radio in your Honda Acty can be a straightforward and satisfying DIY project. Here's a step-by-step guide to help you smoothly replace the radio in your kei truck, ensuring you enjoy your favorite tunes on the go.
1. Preparing for Removal: Begin by removing the ashtray to access the radio bracket. Inside the top of the ashtray compartment, you'll find two 8mm bolts. These bolts are crucial as they secure the radio bracket in place.
2. Tools for the Task: Although these bolts feature a Phillips Head slot suitable for a screwdriver, an 8mm socket wrench is likely more effective for this job. The wrench should be inserted through a hole in the ashtray bracket to reach these bolts.
3. Radio Extraction: Once the bolts are removed, gently slide out the radio. You'll notice the radio electrical plug typically has four conductors: switched 12V, ground, and left speaker positive and negative.
4. Understanding the Wiring: In some Honda Acty models, you might encounter a 6-conductor radio plug. The antenna connector is usually located to the right of the electrical plug. The larger connector's wires include switched 12V (yellow with red stripe), ground (black), left speaker positive (blue), and left speaker negative (gray with black stripe). The smaller connector might have unswitched 12V (white with blue stripe) and 12V for instrument panel lights (red with black stripe). It's important to note that not all models have right door speaker wires.
5. Harness Compatibility: For a hassle-free installation, consider purchasing a wiring harness from eBay that's compatible with the ACTY radio connectors. Search for "ACTY wiring harness" to find suitable options. If your new radio requires a constant, un-switched 12V source for memory retention, use the small connector's white with blue stripe wire.
6. Cigarette Lighter Modification (Optional): If you prefer the cigarette lighter to switch off with the key, change its power supply to the radio's yellow-red wire. However, be cautious, as the cigarette lighter will no longer be able to heat up due to limited power capacity. This modification is ideal if you plan to use the lighter receptacle for low-power devices like GPS or USB converters.
By following these steps, you can successfully upgrade the radio in your Honda Acty, enhancing your driving experience with the convenience of modern audio technology. Stay tuned to the OIWA blog for more insightful tips and guides on maximizing your Honda Acty's potential.


Optimizing Audio Experience in Your Honda Acty: A Guide to Speaker Upgrade

Transforming the audio experience in your Honda Acty kei truck can be both exciting and rewarding. If you're considering upgrading or adding a new speaker, this detailed guide will assist you in navigating the process seamlessly.
1. Preparing for Speaker Installation: Before embarking on your speaker upgrade project, you’ll need to access the speaker location. Start by removing the interior panel. This involves taking out five Phillips head screws – two located at the ends of the grab handle under the plastic caps, one behind the door open latch, and two towards the front of the panel. Gently open the door latch and remove the plastic bezel. For the window crank, slightly pull it away from the door and remove the retaining clip using a seal pick or small needle-nose pliers.
2. Removing the Door Panel: Once the screws and bezel are removed, carefully work around the exterior of the panel, gently popping the plastic rivets. Then, remove the panel by pushing it upward and forward from the rear, bottom corner. This step requires a bit of finesse to avoid damaging the panel.
3. Swapping Out the Speaker: With the panel off, proceed to remove the old speaker. Unscrew the four Phillips head screws holding the speaker and its cup. After removing the old speaker, the next step involves modifying the speaker cup to fit the new speaker. Use a razor knife to cut out the back of the speaker cup, providing clearance for the new speaker’s larger magnet.
4. Adjusting the New Speaker Fit: If your new speakers have a larger frame, you may need to shave their lip at the four corners. This adjustment ensures the new speaker sits flush in the cup. Carefully perform this step to avoid damaging the new speaker.
5. Reassembling the Door Panel: After installing the new speaker, it’s time to put everything back together. Reverse the removal process, ensuring all components are securely fastened. Pay particular attention to the alignment of the door panel as you reattach it, ensuring a snug fit.
6. Recommended Speakers for Your Acty:For an optimal audio experience, consider Rockford Fosgate RFx4 Prime 4-inch speakers, ideal for the Acty’s compact cabin. For those preferring larger speakers, 6.5-inch Pioneer TS-G1340R 2-Way Coax Speakers are an excellent option, requiring minimal modification for installation.
7. Maximizing Audio Quality:Remember, the sound system in your Acty is not just about the speakers. Regular maintenance of the audio system, including checking connections and ensuring your radio is functioning optimally, will further enhance your listening experience.
By following these detailed steps, you can significantly upgrade the audio system in your Honda Acty, ensuring every journey is accompanied by high-quality sound. Keep following OIWA’s blog series for more insights and guides on getting the most out of your kei truck.
 

Effortlessly Installing a Tachometer in Your Honda Acty Kei Truck

 
Adding a tachometer to your Honda Acty can significantly enhance your driving experience, especially if you're keen on monitoring your engine's performance. However, it's crucial to ensure that the tachometer you choose is compatible with a 3-cylinder engine, like that of the Honda Acty. Here's a straightforward guide to help you tap into the Acty's tachometer wire with ease.
Accessing the Tachometer Wire: The first step involves locating the control box and tachometer wire, which are conveniently situated under the passenger seat of your Acty. This design makes accessing these components a breeze. Simply lift up the passenger seat to gain easy access to the box.
Identifying the Tachometer Wire: Once you have the passenger seat lifted, you'll notice a specific box located right underneath. This is where the crucial tachometer wire is housed.
Wire Tapping for Tachometer Installation: The process of wire tapping for your tachometer installation is straightforward. However, it's important to handle this step with care to avoid any damage to the vehicle's electrical system. If you’re not confident in your ability to tap the wire, it might be wise to seek assistance from a professional.
Final Steps and Precautions:After successfully tapping into the tachometer wire, you can proceed to install your new tachometer. Always double-check connections to ensure they are secure and won't interfere with the normal functions of your Acty.
 
Remember, adding a tachometer is not just about enhancing the aesthetics of your dashboard; it's also about improving your ability to monitor engine performance, which can be crucial for maintaining the health of your vehicle.
Conclusion:Installing a tachometer in your Honda Acty is a task that can be efficiently accomplished with the right tools and a bit of patience. By following these steps, you can enjoy the benefits of having an additional instrument to monitor your engine's RPM, ultimately contributing to a more informed and enjoyable driving experience. Stay tuned to OIWA's blog series for more insightful tips and guides on customizing and maintaining your Honda Acty kei truck.


Mastering the 2/4 Wheel Drive Selector in Your Honda Acty

Navigating the 2/4 Wheel Drive Selector in your Honda Acty is a crucial skill for optimizing performance and fuel efficiency. The Honda Acty comes in various models, each with distinct drive options. The SDX and TOWN models feature a selectable 2WD/4WD system, while the STD is exclusively 2WD, and the ATTACK model operates only in 4WD. Understanding how to switch between these modes can significantly impact your driving experience.
Location and Operation of the Selector:You'll find the selector mechanism on the driver's side, precisely where the front drive shaft, also known as the propeller shaft, enters the transmission. Here, a 10mm lock bolt secures a 10mm selector bolt, identifiable by its 30mm shoulder. To adjust the drive mode, first, loosen the lock bolt by approximately three turns.
Switching Between 2WD and 4WD:The selector bolt features a nub or bump on its shoulder, preventing full rotation. For engaging 2-wheel rear drive, rotate this bolt as far as possible counter-clockwise. Conversely, turning it fully clockwise activates the 4-wheel drive. After selecting your desired mode, remember to retighten the lock bolt securely.
Benefits of Switching Drive Modes:Switching to 2-wheel drive can offer noticeable benefits. Some Acty owners report improved fuel efficiency, with increases of up to 3 miles per gallon. Additionally, switching to 2WD can result in a smoother ride, with reduced vibrations. For example, a common steering wheel vibration at 58mph in some Acty models noticeably subsides when switched to 2WD. However, it's important to note that even in 2WD, the propeller shaft and front drive shafts will still rotate due to the motion of the front wheels, although no engine torque is directed to them.
Final Thoughts:Understanding and efficiently using the 2/4 Wheel Drive Selector on your Honda Acty can greatly enhance your driving experience. Whether seeking better fuel economy or a smoother ride, mastering this feature is a valuable skill for any Acty owner. Stay tuned to OIWA for more insights and tips on getting the most out of your Honda Acty Japanese kei truck.
 

Understanding the 1989-1997 Honda Acty: Key Specifications and Performance Metrics

When considering the Honda Acty, particularly the models from 1989 to 1997, it's crucial to dive into the specifications that define this iconic Japanese kei truck. Here at OIWA, we've compiled a comprehensive overview of the Acty's essential stats, giving you a clear picture of what to expect from this reliable vehicle.
Performance and Engine Specifications
Idle and Fast Idle Speeds:
  • Idle Speed: Ranges from 950 to 1000 RPM.
  • Fast Idle: Varies between 2200 and 3200 RPM.
Engine Efficiency:
  • Oil Pressure: Maintains a healthy range of 55 to 64 PSI or 3.8 to 4.4 BAR.
  • Fuel Pressure: Stays between 1 to 2 PSI, or 0.07 to 0.14 BAR.
Fuel Capacity and Efficiency:
  • Fuel Tank: Can hold up to 9.8 gallons or 37 liters of regular, low octane (87 in the USA) gasoline.
  • Gas Mileage: Owners report an impressive range of 35 to 53 miles per gallon (15 to 22.5 kilometers per liter).
Engine Compression and Valve Clearance (Cold):
  • Standard Compression: 9.8:1 ratio, with a compression of 14 BAR (203 PSI) at 250 RPM and a minimum of 9.5 BAR (138 PSI).
  • Valve Clearance: Intake valves at 0.18 to 0.22mm, and Exhaust at 0.25 to 0.29mm.
Emissions and Ignition:
  • CO Emissions: Maintains a level of <= 0.1% at 3000 RPM.
  • HC Emissions: Stays below or equal to 200 PPM at 3000 RPM.
  • Ignition Timing: For manual transmission, it's 4 deg +/-2 deg at 1000 RPM, and for automatic, it's at 1150 RPM.
Suspension and Alignment
Front Suspension:
  • Toe-in: Approximately In 1mm +/-3 mm.
  • Camber: Varies slightly between models, generally around +1 degree +/- 1 degree.
  • Caster and King Pin Incline: Averages around 2.3 to 2.5 degrees, with a King Pin Incline of +12 degrees 30'.
Rear Suspension:
  • Toe-in and Camber: Generally non-adjustable, maintaining a standard 0 +/-3 mm for toe-in and 0 for camber.
Braking System
Parking Brake and Pedal:
  • Parking Brake: Requires a 44 lb (20 kg) pull in the 8 to 12th notch.
  • Brake Pedal: Height from the floor should be around 145 mm, with a backlash of 1-10 mm.
Brake Disc and Pads:
  • Front Brake Disc: Minimum thickness of 10 mm.
  • Brake Pads: Minimum thickness of 3 mm.
Rear Brake Drum:
  • Minimum lining thickness of 2 mm.
The Honda Acty, a vehicle renowned for its durability and efficiency, continues to be a reliable choice for various tasks and terrains. Understanding these specifications is key to optimizing the performance of your Acty. Stay tuned to OIWA for more insights and expert tips on your Honda Acty and other Japanese kei trucks.


Read more

"The Evolution of Honda Acty - A Mini Truck Loved by Americans for Business and Adventure"
April 19, 2023

The Ultimate Honda Acty Guide: Unleash Your Inner Mini-Truck Fanatic

Dive into the fascinating history of the Honda Acty, a versatile mini truck that has become an American favorite. Discover its generations, evolution, and why it's the perfect all-around vehicle for business and adventure.

Read more

"Honda Acty HA3/HA4 Air Filter Replacement - A Clean and New Filter Improving Engine Performance and Fuel Efficiency"
April 19, 2023

Breathe Easy: Quick & Witty Guide to Replacing Your Honda Acty HA3/HA4 Air Filter

Discover the easy step-by-step guide to replacing your 1990-1999 Honda Acty HA3/HA4 air filter. Improve fuel efficiency, performance, and extend engine life with this quick and cost-effective maintenance task.

Read more

Image of a Honda Acty Kei truck parked on a city street. Learn how to overcome the challenges of owning a Kei truck and upgrade your driving experience with OiwaGarage.co's expert support and resources.
April 10, 2023

The Challenges of Owning a Honda Acty Kei Truck and How OiwaGarage.co Can Help

Discover how OiwaGarage.co can help you overcome the challenges of owning a Honda Acty Kei truck. From finding quality parts and accessories to maintaining performance, customizing your truck, and accessing expert advice, our comprehensive selection and dedicated support make your Kei truck ownership experience seamless and enjoyable. Visit our blog to learn more about how we can help you keep your Honda Acty running smoothly and looking its best.

Read more

Honda Acty with perfect tires parked at a picturesque location, showcasing the importance of choosing the right tires for your Kei truck from OiwaGarage.co
April 10, 2023

Rollin' on Rubber: A Tire Guide for Honda Acty Aficionados

Discover the ultimate tire guide for Honda Acty lovers! Explore types of Kei truck tires, essential factors for choosing the right ones, and our top tire picks for your pint-sized powerhouse. Keep your Acty rolling in style with our fun-sized guide and maintenance tips.

Read more

Electric Conversion for Your Honda Acty Kei Truck: What You Need to Know
April 10, 2023

Electric Conversion for Your Honda Acty Kei Truck: What You Need to Know

As the world moves towards electric vehicles and clean energy, converting your Honda Acty Kei truck to an electric powertrain is an eco-friendly and innovative option. In this blog post, we'll discuss the process, benefits, and considerations of electric conversion for your Honda Acty Kei truck.

  1. Benefits of Electric Conversion: Electric conversions offer several advantages over traditional gasoline engines. Some of the benefits include reduced emissions, lower operating costs, quieter operation, and improved performance due to instant torque. By converting your Honda Acty to electric, you can enjoy a more sustainable, efficient, and cost-effective driving experience.

  2. Components Required for Electric Conversion: To convert your Honda Acty Kei truck to electric, you'll need the following components:

    • Electric motor
    • Motor controller
    • Battery pack
    • Battery management system (BMS)
    • Charger
    • DC-DC converter
    • Wiring and connectors
    • Electric throttle
    • Instrumentation and gauges
  3. Choosing the Right Electric Motor: There are several types of electric motors available for conversions, such as DC series, DC shunt, and AC induction motors. It's essential to choose a motor that meets your desired performance, efficiency, and cost requirements. Research and consult with experts to determine the best motor for your Honda Acty conversion.

  4. Selecting the Right Battery: Battery technology is a critical aspect of any electric conversion. Lithium-ion batteries are the most popular choice for conversions due to their high energy density, long cycle life, and lightweight nature. Consider factors such as range, weight, and charging time when selecting a battery pack for your Honda Acty.

  5. Legal and Safety Considerations: Before undertaking an electric conversion, research local laws and regulations regarding electric vehicles and conversions. Some areas may have specific safety requirements or restrictions on converting gasoline vehicles to electric. Ensure that your conversion adheres to local guidelines and safety standards.

  6. Cost and Time Investment: Converting a Honda Acty Kei truck to electric can be a significant investment in terms of cost and time. The cost will vary depending on factors such as the motor, battery pack, and other components, as well as labor if you're not performing the conversion yourself. Be prepared for a potentially lengthy process, especially if you're new to electric conversions.

  7. DIY or Professional Conversion: Some Honda Acty owners choose to perform electric conversions themselves, while others prefer to hire a professional conversion shop. If you have the necessary skills, tools, and time, a DIY conversion can be a rewarding and cost-effective option. However, if you're not comfortable with the technical aspects of the conversion, consider hiring a professional to ensure a safe and successful outcome.

Converting your Honda Acty Kei truck to electric power can provide numerous benefits and contribute to a cleaner environment. By understanding the process, components, and considerations involved in electric conversions, you can make an informed decision about whether this option is right for you and your Kei truck. If you decide to go forward with an electric conversion, OiwaGarage.co is here to help with parts, accessories, and expert advice to make your project a success.

Read more

Top 5 Must-Have Accessories to Customize Your Honda Acty Kei Truck
April 10, 2023

Top 5 Must-Have Accessories to Customize Your Honda Acty Kei Truck

Your Honda Acty Kei truck is more than just a reliable and efficient vehicle; it's a blank canvas for personalization and customization. In this blog post, we'll explore the top 5 must-have accessories to make your Honda Acty stand out and express your unique style.

  1. Custom Decals: Personalize your Honda Acty with custom decals, showcasing your favorite designs, colors, and patterns. Decals are a simple and cost-effective way to make your Kei truck truly one-of-a-kind, reflecting your personality and style.

  2. LED Lighting: Upgrade your Honda Acty's lighting with energy-efficient and visually striking LED lights. LED lights not only enhance your vehicle's appearance but also improve visibility and safety on the road. Choose from a variety of colors and styles, such as underbody lighting, interior accent lights, or upgraded headlight and taillight assemblies.

  3. Aftermarket Wheels and Tires: Custom wheels and tires can drastically change the look and performance of your Honda Acty. Choose from a range of stylish rims and high-performance tires designed specifically for Kei trucks to improve handling, traction, and overall appearance.

  4. Performance Air Filters and Exhaust Systems: Boost your Honda Acty's performance and sound with upgraded air filters and exhaust systems. High-performance air filters improve engine airflow and efficiency, while aftermarket exhaust systems provide a sportier, more aggressive sound and can enhance your Kei truck's performance.

  5. Interior Accessories: Customize your Honda Acty's interior with accessories like custom shift knobs, seat covers, and floor mats. Choose from various materials, colors, and designs to create a unique and comfortable cabin tailored to your preferences.

Your Honda Acty Kei truck is a versatile vehicle that's ready for personalization. With these top 5 must-have accessories, you can transform your Acty into a reflection of your unique style and personality. OiwaGarage.co is your one-stop-shop for all your Honda Acty customization needs.

Read more

Honda Acty Kei truck prepared for off-road adventures with essential upgrades and accessories
April 10, 2023

Off-Road Adventures with Your Kei Truck: How to Prepare Your Honda Acty for Off-Roading

Discover how to prepare your Honda Acty Kei truck for thrilling off-road adventures. Learn about essential upgrades, maintenance, and safety tips to enhance your off-roading experience while protecting your Kei truck.

Read more